
From BC Counter Info
We are writing this zine as anarchists living in so-called Canada seeking to spread attack against extractive projects of the state and capitalism. We come from an insurrectionary, eco-anarchist, anti-extractivist, and anti-colonial background, and draw inspiration from the methods and tactics employed by eco-saboteurs in the ecological movement in North America through the 1990s and early 2000s. Building off of various monkeywrenching techniques from this era, this zine will focus on updating information around tactics and techniques of sabotage against heavy machinery.
1. Introduction
The goal of our experiment was to find a method of sabotage that would be undetectable by our enemies until much later, long after we were gone and the damage was done. This means, in short, without using incendiary or explosive devices, or any kind of obvious visible destructive techniques. While being undetectable, we wanted to find tactics that would cause the maximum amount of damage throughout the whole system of the machine, causing the longest delays and most expensive continuation of the extractive project. We hoped to find an easily replicable, difficult to trace tactic that could be proliferated, especially at sites where there was not yet widespread attack against the project (so as to keep a low profile and not immediately raise the stakes), or at sites which were already attacked and under surveillance (to allow our friends time to escape without suspicion).
We tested a variety of techniques from the ecological movement, as detailed in Earth First! and ALF/ELF manuals, the Monkeywrenching Handbook, and other online resources (see Resources). We wanted to see if these techniques were still applicable, several decades later, as much of the technology around heavy machinery has changed. We applied as close to a scientific method as we could given the circumstances, wanting to be certain our techniques worked. We wanted to be able to share our research with our comrades of a similar mind so that they could take and use these techniques without having to recreate the same months and years of testing and experimentation.
Our goal ultimately is that these techniques, if successful, would be applied to relevant targets. In the context of Canada, which is and always has been an extractive project, extractivism is essential for the economy, state power, nation building, and the war machine. The heavy machines that do the work are tangible, exposed, expensive, and an attack on them has the potential to set a project back directly and significantly. If we’re lucky, we can destroy the machines before they carve open the earth. As anarchists who are against the destruction of nature and for the destruction of the Canadian state, we ground this technical and practical text in a political theory of anarchist direct action.
Ultimately, the techniques we wanted to experiment with failed, which is valuable to know. And we still think there are valuable things that we learned as part of our experimentation, which we want to offer to our friends and comrades. We want to share this information so others don’t need to reinvent the wheel when researching, and to give a basis for understanding what does or doesn’t work. We also welcome being told what we did wrong, or hearing if others found things that worked.
2. Update of Old Information
To begin our research, we read through known resources. Namely, we looked at Ecodefense: A Field Guide to Monkeywrenching (Third Edition) by Dave Foreman and Bill Haywood. This book, published in 1993, is available online, and has 350 pages of advice, skills and knowledge about direct action and sabotage. We mainly focused on Chapter 5: Vehicles and Heavy equipment.
Unfortunately, a lot of the information found there was somewhat outdated, as the machinery has evolved since the 1990s, hence our need for experimentation and exploration. The logic behind the techniques are still applicable however, and the authors mainly argued for sabotaging the lubricating systems of the heavy machinery, as this is a slow technique that provides a time delay between when the saboteurs attack and when the machine is crippled. From there, we were inspired by the idea of abrasives (carborundum, or silicone carbide) inside the fuel system and oil lubricating system. The manual is not very specific in terms of quantities, and the procurement of the abrasives became the most clear barrier: the abrasives are only found in specific sandblasting industrial shops or in car mechanic shops. Buying it in person in large enough quantities without drawing attention was complex, and we could not figure out how to order it online anonymously, as we always had to order it from very specific retailers that required a lot of company information for the order.
We also looked over the Office of Strategic Services 1944 Simple Sabotage Field Manual, which was the precusor to the CIA. This manual is a primer by the USA forces to encourage European citizen to sabotage their enemies during the Second World War, and must be understood as facilitation of USA control and imperialism. Again, the information here, while hilarious in some sections (specifically when they speak about sabotaging meetings), is mostly outdated. The Monkeywrenching Handbook spoke about “caccolube”, which were used to destroy tanks, but the instructions on how to make it are not found in this manual. With further research, we narrowed down the caccolube recipe to a condom filled with abrasive dropped into the oil tank. The hot fuel melts through the condom and releases the abrasive into the machine’s lubrication system. Unfortunately, in today’s engines, the oil filter blocks the introduction of a filled condom. We did not test this method exactly, but we took the logic of introducing abrasives into the oil tank from this text.
We also read through the ALF Primer, but again, not much information seemed to have been thoroughly tested, and most was repetition of the Monkeywrenching handbook. We will discuss a number of these techniques in this text, going over the pros and cons with what we know and stressing over what we do not know .
Based on these sources and the lack of updated information that applies to our current situation, we began creating our own research into slow methods of destruction, looking mainly at sabotaging the oil lubrication system using bleach and liquid glass.
3. DNA Measures
When playing with any machinery, one must think about the DNA traces left on site and on the machines themselves. This section will go over briefly some key takeaways about DNA safety in the field and will refer to other existing resources.
The No Trace Project (https://www.notrace.how/) is an excellent resource hub for surveillance. The zine DNA You Say? Burn Everything to Burn Longer: A Guide to Leaving No Traces (https://www.notrace.how/resources/download/blabladn/dna-you-say-read.pdf) is the main source of information used. We will not go into detail into the DNA-safe protocol they highlighted, rather we recommend you read the whole zine and then come back to this section to have some useful updates from field testing. We cannot recommend enough the zine, please do read it before adding our tips.
There are three broad areas that you move through while doing an action. The first one is the baseline of your normal life, where it makes sense for you to be and is not linked to doing an action. When you move into the action area, this is the broad space where it is dangerous for you to be seen and recognized. Then there is the target area, where you will be doing your sabotage. Somewhere between the action area and the target area is where you will set up a DNA-safe changing zone.
During transportation, you are in your clothes or new clothes (outfit #1), as it is not sketchy for you to be seen there. Outfit #1 is a normal enough outfit that you can be seen in without any security nor surveillance risk. You need to determine where it starts becoming unsafe for you to be seen in the area to determine the threshold for changing into your action clothes. Close to the action area, which can either be before leaving your main transportation, or before getting into the action area, you change into your action clothes (outfit #2), which are non-descript and fully anonymizing (face covered, all skin covered). This outfit #2 is composed of new clothes and shoes that are not your own nor similar to ones you own (and can be bought at a second-hand store to reduce costs). You will then arrive to your DNA-safe zone and change into your DNA-safe clothes (outfit #3). After moving to your target and doing the action, you can return to the DNA-safe zone and change back into outfit #2. You will exit the action area, get into outfit #1 and destroy both outfit #2 and #3 (and outfit #1 if necessary; i.e. if you have a suspicion that you were seen in it in the action area) before returning home.
There is not an exact science to where the DNA-safe changing zone should be, as it varies based on the action site. Some guiding principles would be:
- The zone is close enough to the target + that once people are in their DNA-safe getup, they minimize the risk of getting DNA contaminated by moving through the field (i.e. ripping the clothes, hurting themselves);
- The zone is far enough that it would be hard to trace back one’s steps from the target to the zone;
- The zone is secluded and far from any surveillance infrastructure;
- A person can easily scout while the others change;
- You can comfortably be in the zone for up to half an hour;
- You have scouted the zone and are knowlegeable about it.
We tried using painters suits, which are full white suits that zip up with a hood, leaving the hands and feet outside. These suits are not ideal for actions done in the woods, as the white is a dead visual give-away against the darkness of the night. They are also quite hot, get sweaty fast, and and don’t stretch, so can easily rip (especially if you have a fat ass).
We suggest instead to get second-hand clothes that are dark and non-descript or of a camouflage suitable for the area. These clothes should be acquired in a way that minimizes your DNA put onto them. To limit DNA transfer, always wear gloves when manipulating them, carefully and quickly put them in plastic bags that are tied by the cashier and then wrap that internal bag with an additional external plastic bag. Essentially, you do not want these clothes to touch you in any way, neither your body nor your hands, nor your breath nor hair. In some second-hand stores, especially huges ones, it is not strange to be wearing gloves to touch clothes. Otherwise, you can just put on your best germophobic acting skills. These clothes will then stay in the double bags until you are at the DNA changing zone at the time of the action.
These clothes should cover your whole body, ideally going over your outfit #2, and be anonymizing in the same way. DNA You Say? covers this in more depth, but our essentials include:
- Full body cover (hoodie and pants that will still cover you when you move)
- Goggles to stop eyelashes and eyebrow hairs from falling OR use vaseline to stick them to your face and wear safety goggles if necessary for safety
- Face mask that fully traps all the air you breath in the mask
- Shoe covers that will cover your socks and pants, such as an additional pair of socks you can put around it all or bags. Latex waterproof shoe covers can also be used t minimize footprints however they don’t cover the whole foot and ankle in a way that traps your DNA inside.
- Gloves (several pairs)
To know how to change in the zone, please refer to the DNA You Say? zine. Ideally, you will need two if not three people, so one person can scout will the other two are changing. One person is always looking at the other one changing and making sure they aren’t making any DNA mistakes. If they do, pack away the item and take a double. Take your time with the changing, do it in a controlled and methodological way.
The whole goal of the DNA-safe protocol is to minimize the DNA left on site. Practice changing beforehand so it will go without DNA mistakes on the day of action. Between yourselves, based on your threat model, you can decide which DNA mistakes are okay and which mistakes will mean that the action must be terminated. We recommend that no mistakes are made during the DNA changing process, as any mistakes essentially cancels out the usefulness of the process. The DNA-safe protocols only minimize DNA left, but we can never be fully certain that nothing will be left on the site, especially as forensic technology keeps improving. We are by no means forensic data specialists, but from what we have read, any DNA at the action site can be incredibly dangerous. Inform yourself on the essential use of DNA-safe protocols before taking on actions that could result in forensic investigation.
4. Machine safety
After talking about our own safety it is important to consider the safety of the workers using this heavy machinery. They are humans stuck in a destructive system just like us and even if they have shit politics or work in a bad industry it is not a reason to put their lives in danger. As such none of the techniques we propose in this text are dangerous for the next operator. We chose not to put contaminants in fuel as uncontrolled mixing of chemicals which are used in a combustion engine could cause unforeseen emission of gasses or out of control burning while someone is in the cockpit.
We did not try to sabotage the hydraulics of the excavators for similar reasons. Hydraulics are the pressurized liquid inside the machine that enables it to do heavier tasks. For example, it is the hydraulic system that enables the excavator bucket and arm to move and to stay upright. Most of the time, when excavators are off, the bucket is resting on the ground. However, for some bulldozers, telehandlers and motor graders, their buckets or arms are still in the air and are maintained in that position thanks to the hydraulics, even when the machine is turned off. Sabotaging them would mean that the pressure in the hydraulic system is released, leaving the buckets or arms to fall in unpredictable ways. This is very dangerous. Also, if a hole would be made in the hydraulic cables, the potential resulting jet of pressurized oil is able to pierce throught a human body. This would cause instant blood poisoning, which requires going to the nearest hospital and having your blood drained and replaced. Good luck explaining what caused that to the doctors. Despite much research, we do not know how and have not tested how to sabotage the hydraulic systems in a way that is safe for the saboteurs or the workers. Most other guides mentioned arrive at the same conclusions.
5. How It Works
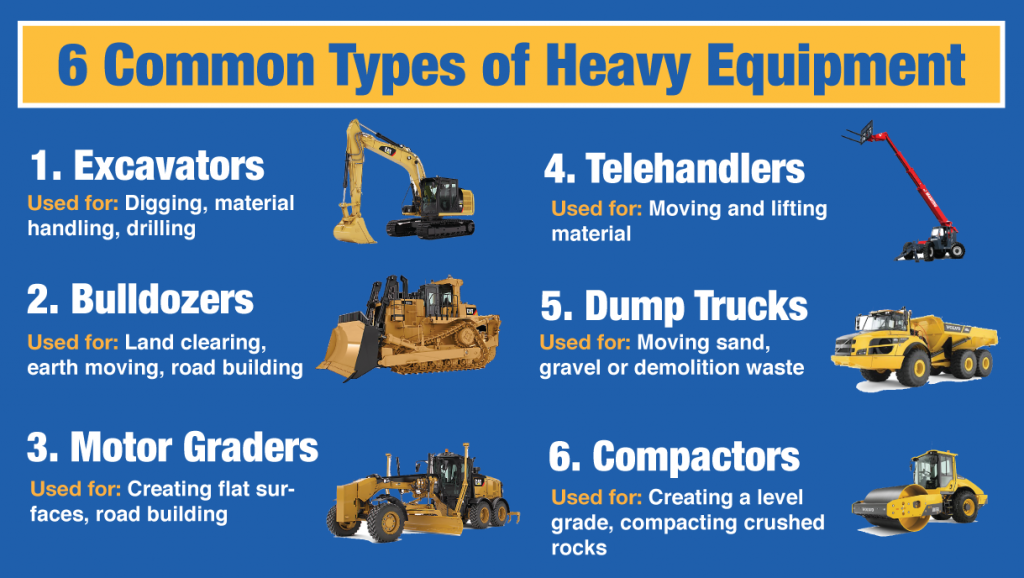
Machinery can seem very complicated when you open it. Understanding all of it is a whole field of specialization. There is a long list of different machines with different purposes (which you should learn how to differentiate to be able to communicate clearly), but to destroy it we do not need to know every single working part. A broad understanding of the main components is enough to make us efficient at recognizing what we can work with, what we can ignore and what we need to keep away from.
Most heavy machinery is, at its core, a combustion engine plugged to a lot of hydraulics. To function, the engine needs four main components: air, fuel, energy and oil. Each of them have an asisgned system that connects to the engine block and to all of the other systems (hydraulics, transmission, joints, cooling, etc…). These are the main ones because if one of these doesn’t work, neither the engine nor the other systems will work and we will have decomissioned an expensive machine.
Here’s a simplified diagram to show you how an engine works. This diagram uses official terms which enables you to research more and understand better how any of this works if you are up to it (we strongly recommend it).
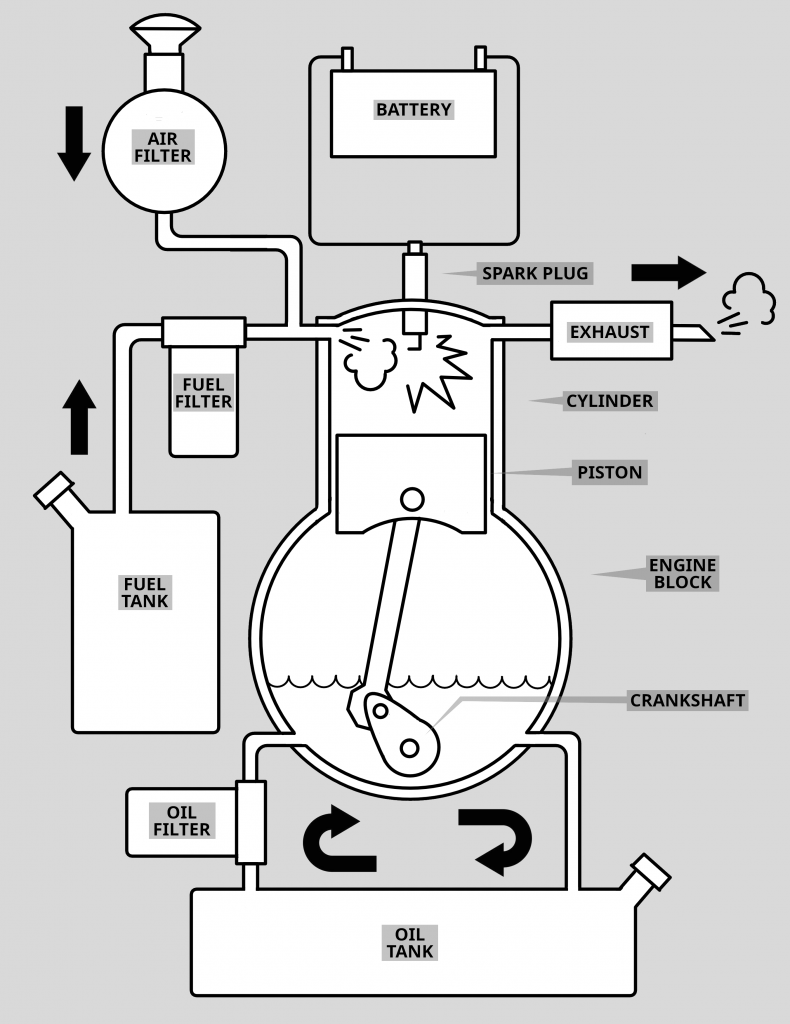
The engine will pump a specific amount of fuel and air (which pass through their own filters) inside the cylinders located inside the engine block. This mix will be lit by the spark plug (which is connected to the battery) to create an explosion which pushes the piston down. This action moves the crankshaft and distributes the energy to the transmission and the rest of the machine. The resulting gasses are then taken out of the cylinder towards the exhaust and replaced by a new mix of air and fuel which starts the cycle again. This system needs to be well oiled so it does not break apart or gets overheated as most of it is metal rubbing against metal powered by explosions. The oil gets filtered and distributed through the whole engine by its own system. The specific entrypoints of the oil vary on the specific engine and are therefore not accurate on this diagram.
Usually, on any working site the drivers need to inspect the machinery before using it. Obvious alterations to the systems will be picked up unless the workers don’t do their job (don’t count on that).
6. Different Techniques
Subtle techniques
Air filter
The air system contains some of the easiest parts to access and tinker with. Once we go past the filters we can clog the air intake, and without air, no combustion can take place inside the engine. It is an efficient way to stop the engine, but definitely not to break it. Depending on the action we take once we have access past the filters, the outcome can vary greatly: from instantly stopping the machine, to subtly breaking costly parts.
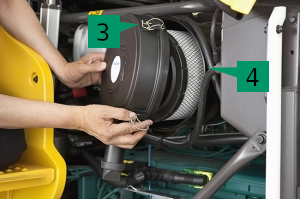
The air intake brings the air throught two filters, one inside the other, so rocks and dust can’t enter the engine block. The filters are inside a plastic or metal drum the size of a small trash can¹. On most equipment the filters are near where the air intake is located², otherwise it is usually easy to find the drum as it’s one of the biggest filter in the whole machine. The lid, about the size of a record, is held on with metal clips³. Use a screwdriver to pop the clips open. Always work carefully and methodically, as sometimes they will pop open fast and break skin. Once the lid is open the main filter is exposed⁴, and we can pull it out, exposing the safety filter⁵ which we can also take out with a simple pull, giving us access to the air system.

At this point we can choose what to do.
- Dispose of the filters somewhere. Dust and debris will get in and either clog or eventually wear down the valves and pistons, but only if no one notices that the filters are missing. If workers inspect the machine it will be incredibly obvious that the filters are gone and the machine won’t be started until they are replaced.
- Pierce the filters. They are made of plastic and paper, making it easy to do. Dust and depris will eventually get in.
- Insert solid contaminants, like rock, sand or silica which will wear down the turbocompressor and the intake valve. It will take a long time to do substantial damage.
- Insert liquid contaminants, such as water or expansive foam to clog the air intake and immediately stop the engine from starting.
Tools needed include a screwdriver, your contaminant of choice and (depending on the machine model), and a funnel. Here’s a detailed to-do list on how to put contaminants inside the air system:
- Locate the air filter.
- Open the lid with pliers/screwdriver.
- Take out main filter and safety filter.
- Insert your contaminant of choice down the inlet.
- Put back the safety filter and the main filter.
- Close the lid.
- Leave.
We did not test this technique yet.
Oil filter
The oil distribution system is a direct path to some of the most expensive parts of a machine, namely the engine block, pistons and the crankcase. Corrupting its capacity to keep everything well lubricated can break all the most important pieces of the engine all at once, leaving the contractors with no other choice than replacing the whole machine or expensive repair costs.
In the old documents we researched, the writers present this as a magic bullet that would instantly shut down the machines. Dropping a handfull of abrasive material or even sand in the oil tank, and the machine can’t continue its business as usual. In our experience this is far from the truth – the action is slow and it is hard to confirm its efficiency.
Nonetheless it is clear that adding contaminants that can’t be filtered in the oil distribution system is bad for these giant machines. The oil filters are designed to be more and more efficient at blocking the tiniest of impurities, so we need to find ways to circumvent them. Not an easy task, especially since most of the interesting contaminants (silicon carbide, aluminium oxide, titanium oxide) used by the old timers in the U.S. are really hard to find here in Canada. However, it is possible to enter the oil distribution system if the contaminant we are introducing is a liquid. The filters need to let the oil pass through them for the engine to work, therefore anything with a similar consistency will pass throught the system without issue.
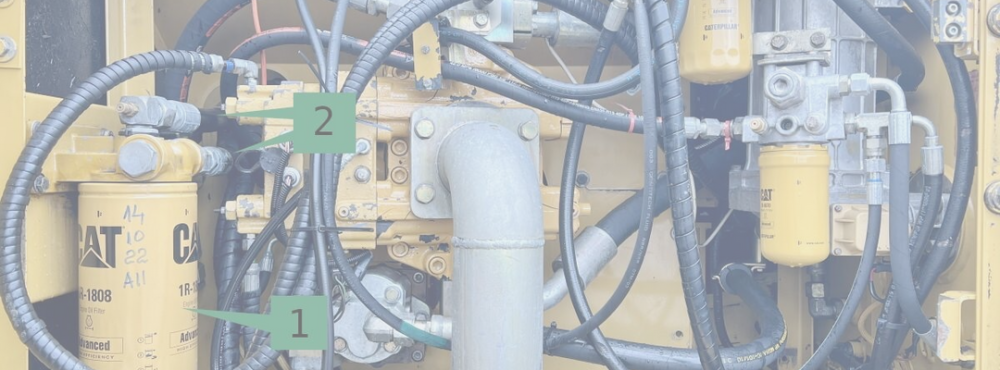
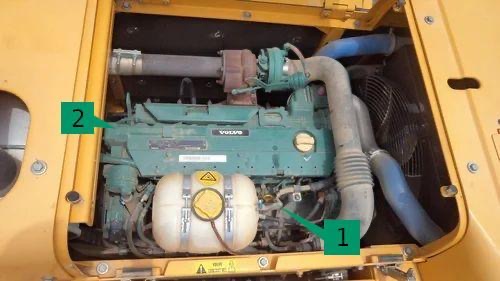
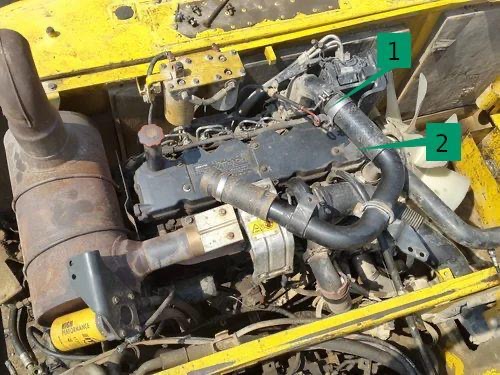
Another problem to account for if you want to insert contaminants is that the oil filler neck is sometimes hard to find on these machines. Machine grime obscures the indications on the caps and sometimes the indications are just not there to begin with. It is possible to circumvent this problem if we pour the contaminants through the engine oil dipstick, which is usually easier to find and identify. To find the dipstick we often need to climb on the machines and open some of the hoods as every machine has it in a different place. The dipstick is a long metal strip with a small circular handle that fits into a long slender tube¹. It is used to look at the level of oil inside the engine block. Depending on the model there are a bunch of different dipsticks, so its important to find the right one. A good way to find it is to look for the one that is the closest to the engine block². Afterwards the only question is which contaminant is the best for what you want to do.
Here’s a list of some interesting choices for us.
- Inserting a mix of engine oil and abrasive material like silicon carbide, aluminium oxide, titanium oxide. The finer, the better. We tried to get access to all these materials without success, as the only way we found to buy it was by direct contact with the producers which was not possible to do anonymously. And even if we could have, individuals buying these materials in small quantities would have been really suspicious and the filters might be too good now to let these contaminants through, therefore we did not test this technique.
- Adding anti-freeze to the oil tank. Supposedly, because it can’t compress, it breaks gears inside the transmission system, and as it is non-lubricating it would not protect the parts it is supposed to. We tested this mix inside a 500ml metal bottle with a ratio of 1 part anti-freeze to 4 part oil. After 19 hours the oil became opaque. As the workers typically need to inspect oil before using any machine we felt that this technique would be rapidly discovered and we did not test this technique any further.
- Inserting gasoline inside the oil tank. Supposedly gasoline breaks down oil and renders it non-lubricating. We tested this mix inside a metal bottle and while it definitely reacts together (there is visible slow swirls moving in the liquid) it does not seem to render it less lubricating. The test was run for 19 hours in a 500ml bottle with a ratio of 1 part gaoline to 4 part oil. Since it looked inconclusive, we did not test this technique any further.
- Inserting water inside the oil tank. As oil floats on top of water, it’s the latter that would be used in the system before the oil and would be useless as a lubricant. This technique seemed like the least efficient of all so we did not test this technique any further.
- Adding bleach to the oil. It breaks down oil and renders it non-lubricating. We tested it but cannot confirm nor disprove that it worked and cannot tell how fast or slow it worked.
- Inserting liquid glass inside the oil tank. There is a whole chapter dedicated to liquid glass and how to prepare it. We tested this more extensively.
Tools needed include a clean funnel (with a really slender opening as the dipstick has a really small opening), and bottles of your preferred contaminant. Here’s a detailed to-do list on how to put contaminants inside the oil system:
- Find the engine oil filler cap or the engine oil dipstick.
- Open it.
- Pour the contaminant. (This step can take a considerable amount of time as some of the contaminants have a thick consistency and pour slowly in a small opening. It took us over 5 minutes for a single machine.)
- Slip the dipstick back into place. (This can be tricky as the dipstick is very long and bendy.)
- Grab the empty bottles, lids and close the hood.
- Leave.
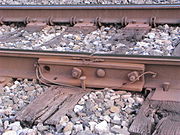
Zerts/Nipples
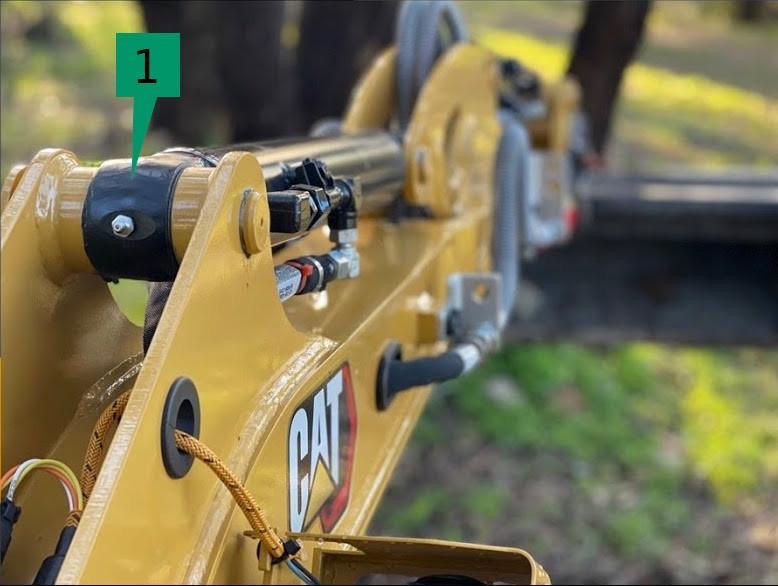
Every moving joint of the machines must have some type of lubrication to prevent overheating and premature wear out. This lubrication is provided through small openings called zerts or nipples¹. It is theoreticly possible to insert abrasives in these joints and wear the machine out in places where it would be harder to repair or replace. This is also one of these techniques that our outdated sources present as a magic bullet: they would insert the abrasives and the machine would grind to a halt without anyone noticing.
Per experience, this is hard to believe. These zerts are filled with grease using a grease gun, it is a regular maintenance obligation and are therefore constantly refilled with new grease. It is possible (and easy) to push out the old grease withe the new one that is inserted. All of that means that whatever we would be able to put in the zerts would be just as easily removed at the first sign of a problem, probably way earlier than it would become effective. As with the oil filter, the main difficulty with testing this technique was the ordering of the abrasive material. Taking all of this into account we did not test this technique as it seems worthless. We encourage you not to waste your time with this.
Mix and match
As is written in other sections of this text, many liquids in these machines do not react well if they are mixed. Fuel is supposed to break down the lubricating properties of oil, anti-freeze doesn’t compress and can’t be used as lubricant, fuel is worthless as a coolant, etc… Being able to mix the liquids of the machine itself without the need to bring something more to the location is alluring. It has the potential to leave no trace and when a problem would arise, seem very serious as it would indicate major leaking of most of the systems.
The problem with this technique is finding a way to pump the liquids into another’s tank. We haven’t found any way to do that safely and as such, we did not test this technique.
Non-subtle techniques
Final Drive
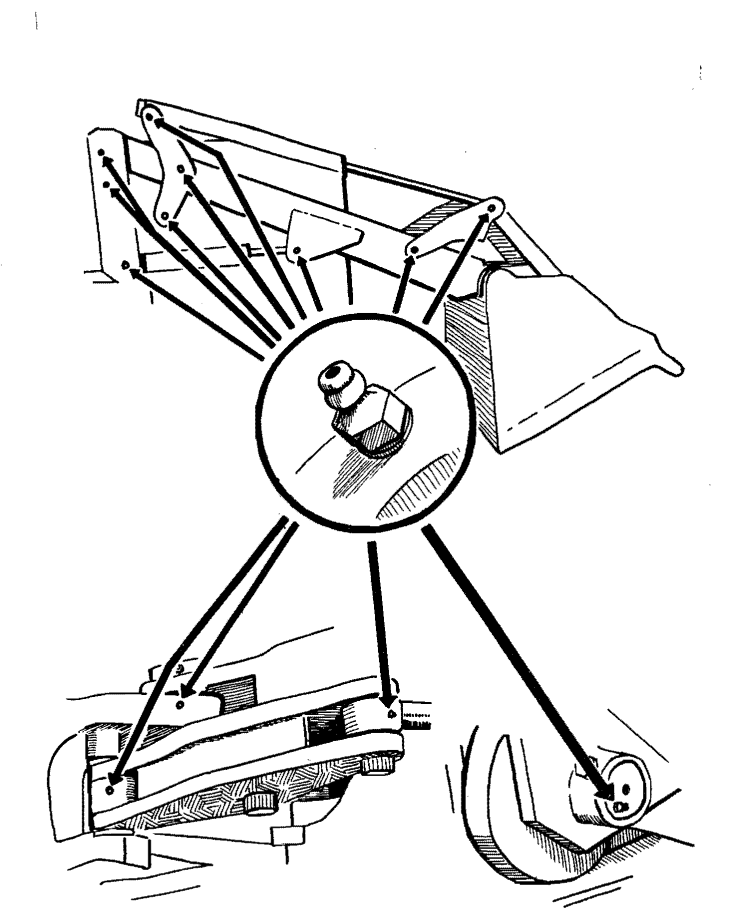
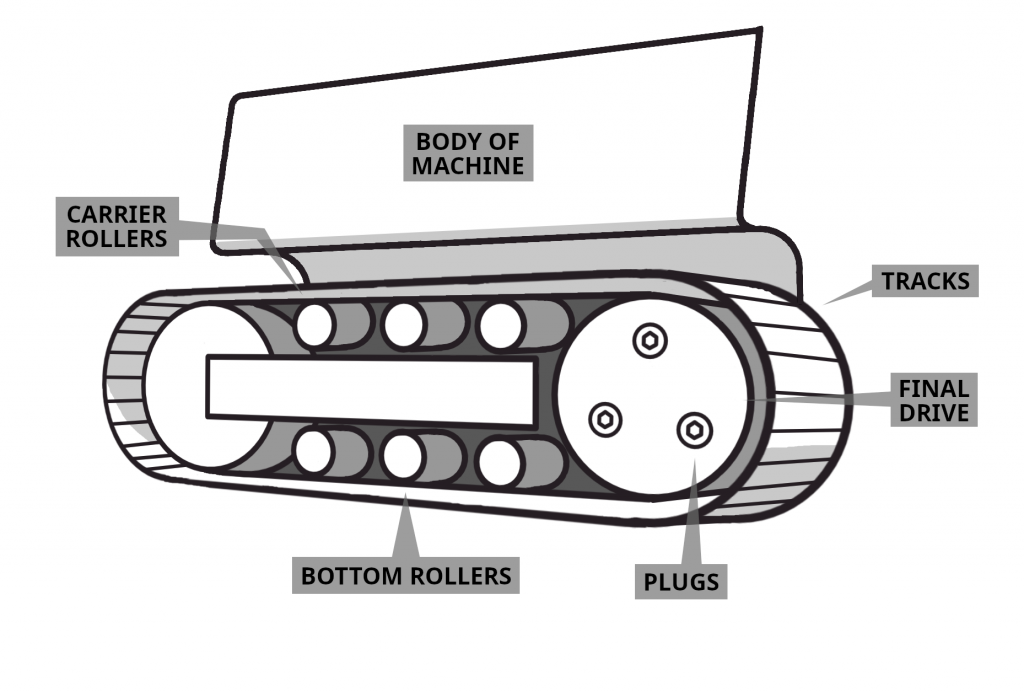
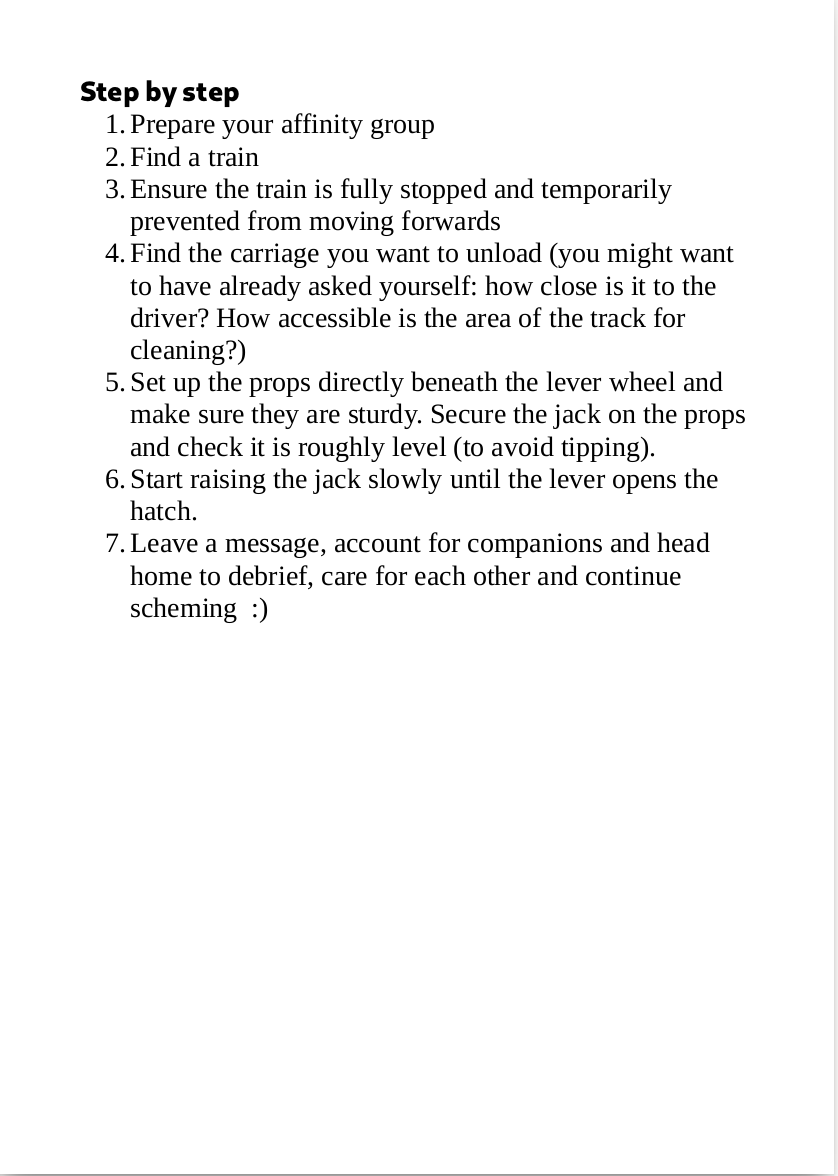
The final drive is, in short, the end of the transmission system which brings the engine’s power to the tracks on heavy machinery. The final drive is filed with gears and bearings which all require a lot of oil to function without problem. Without this oil the gears would grind against each other and potentially break if used. As with every other oil, it needs to be changed as part of usual maintenance. The part where it gets interesting is that while usually engine oil (and filters) needs to be changed every 200 hours of work, the final drive’s oil needs to be changed every 800 hours of work. It is more unlikely that the workforce using the machinery will have the necessary oil at hand when working in a remote location, and draining that oil would halt their work quickly. As with every other technique in this section, this would not be subtle. The final drive is filled with approximatively 5 gallons (22.5L) of oil, and draining it (even really carefully) would leave traces, stains or us with a container filled with 5 gallons of oil. Nevertheless, if our plan is just to stop the workers from continuing with business as usual, it is a simple option.
Tools needed include a long and sturdy ratchet and associated sockets. Here’s a simple diagram to help you find the final drive.
Here’s a detailed to-do list on how to drain the final drive:
- Find the final drive.
- Warm up the final drive by running the excavator a few minutes and position the final drive so the lower drain plug is at the 6 o’clock position and the fill plug at 12 o’clock.
- Carefully remove both the top (fill) and bottom (drain) plugs using the ratchet. Take care not to soil yourself with the oil coming out.
- Either reinstall the plugs using the ratchet or dispose of them.
Oil Filter
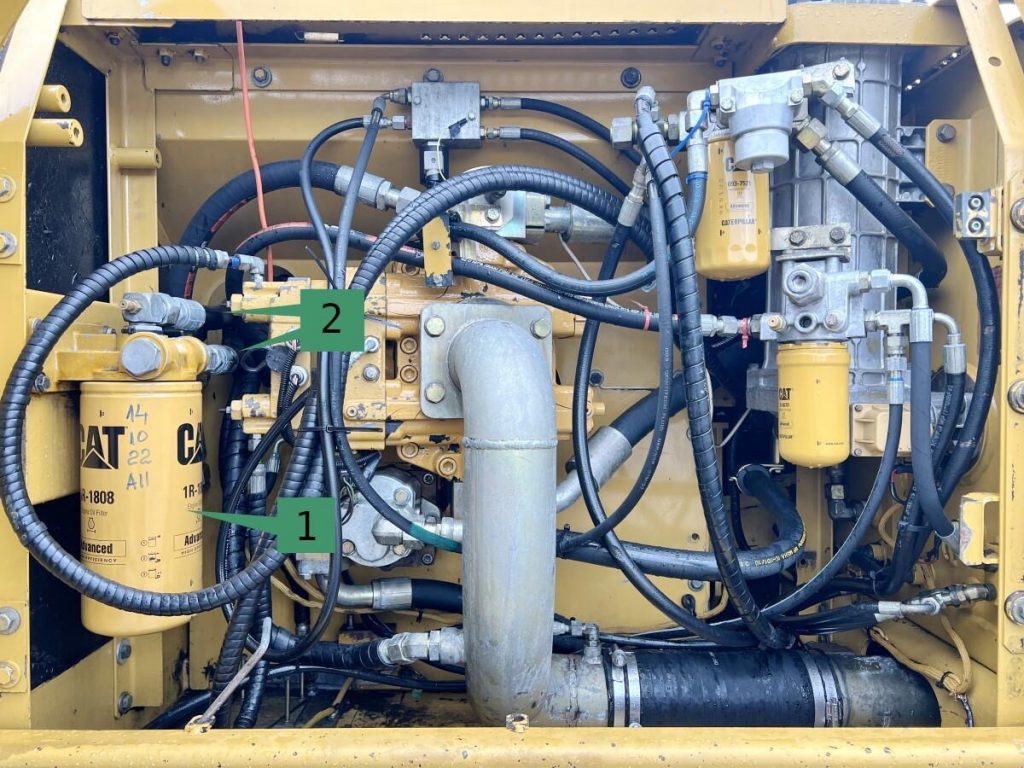
There are easier ways to stop the lubrication of the whole system, but these techniques would be discovered instantly. But if our plan is just to stop the machines, they are good and reliable. We could either remove or pierce the oil filter (or any filter at hand for that matter). Usually, the workers would see in the morning that the filters are missing or broken as the machines are supposed to be inspected every day before work, and they wouldn’t start the machines without replacing the missing parts. Their access to new filters and oil depends entirely on their preparedness, so how effective and long-lasting these techniques depend on this
Finding the oil filters is an easy task. The filters look like this¹ and are usually close at hand once you open the hoods as they are supposed to be changed regularly. The amount of different filters depends on the type of machinery and the model, but the filters are all identified clearly. (Again, we could also break or steal any filter, but the oil and fuel one are the most important.) Once we have located the filter, we can start working. Removing or piercing the filter will release a huge amount of oil, as the filters are screwed on to the throughlines² and can hold up to two liters of oil. All of this oil is a liability to leave prints and traces everywhere, so as always, be careful.
Removing the filter
Tools needed include a specialised oil filter wrench and a clean plastic bag.
Here’s a detailed to-do list on how to remove the filter:
- Find the oil filter.
- Find a secure grip on the filter with the wrench (be mindfull on the oil coming out)
- Put the filter in the plastic bag and close it securely.
- Leave.
- Dispose of the filter or burn it.
Piercing the filter
Tools needed include a screwdriver, a screwpunch and a hammer.
Here’s a detailed to-do list on how to remove the filter:
- Find the oil filter.
- Pierce the filter using the screwdriver and hammer. (Try to punch the hole near the top of the filter, it might sound really loud.)
- Leave.
Lock Jamming
Jam door and ignition locks with slivers of wood, and a hard tough cement like “super glue” or silicone rubber sealant.
7. Liquid Glass
While reading around, we stumbled upon “liquid glass”, a solution of sodium silicate, made of sodium hydroxide (NaOH, known as caustic soda or lye) and silicon dioxide (SiO2, known as silica). Silicon dioxide is found in nature as quartz, and is an essential component in making glass. Essentially, this is an aqueous (water-based) solution that when heated transforms the dissolved silica into its hardened state. In theory, this very thick liquid can be poured into the oil engine reservoir, will go to the bottom as it is more dense than oil and remain there inertly until the engine is turned on. Once the engine is on, the high heat would transform it into a hard abrasive, effectivly destroying the engine.
In 2009, there was a state-run program in the USA called Car Allowance Rebate System or Cash for Clunkers, that would pay-off car owners to trade in their used cars. The program instructed the car dealerships to disable the engine by draining the engine oil, filling it with two quarts (1 quart = 0.95L) of a solution of 40% sodium silicate/60% water and then running it at 2000rpm for at least 7 minutes. Once this was done, the engine was completely disabled.
| Appendix B to Part 599 – Engine Disablement Procedures for the CARS Engine Disablement Procedures for the CARS Program THIS PROCEDURE IS NOT TO BE USED BY THE VEHICLE OWNER Perform the following procedure to disable the vehicle engine. 1. Obtain solution of 40% sodium silicate/60% water. (The Sodium Silicate (SiO2/Na2O) must have a weight ratio of 3.0 or greater.) 2. Drain engine oil for environmentally appropriate disposal. 3. Install the oil drain plug. 4. Since the procedure is intended to render the engine inoperative, drive or move the vehicle to the desired area for disablement. 5. Pour enough solution in the engine through the oil fill for the oil pump to circulate the solution throughout the engine. Start by adding 2 quarts of the solution, which should be sufficient in most cases. CAUTION: Wear goggles and gloves. Appropriate protective clothing should be worn to prevent silicate solution from coming into contact with the skin. 6. Replace the oil fill cap. 7. Start the engine. 8. Run engine at approximately 2000 rpm (for safety reasons do not operate at high rpm) until the engine stops. (Typically the engine will operate for 3 to 7 minutes. As the solution starts to affect engine operation, the operator will have to apply more throttle to keep the engine at 2000 rpm.) 9. Allow the engine to cool for at least 1 hour. 10. With the battery at full charge or with auxiliary power to provide the power of a fully charged battery, attempt to start the engine. 11. If the engine will not operate at idle, the procedure is complete. 12. If the engine will operate at idle, repeat steps 7 through 11 until the engine will no longer idle. 13. Attach a label to the engine that legibly states the following: This engine is from a vehicle that is part of the Car Allowance Rebate System (CARS). It has significant internal damage caused by operating the engine with a sodium silicate solution (liquid glass) instead of oil. |
Excited about this discovery, we set out to make sodium silicate, using this formula:
2NaOH + SiO2 → Na2O∙SiO2 + H2O
To destroy one engine, we found the engine oil capacity of the targetted heavy machinery (by looking up the specs for the precise machine, using Ritchie Specs website), which ranged from 25 to 35L. We went back and forth about the appropriate amount of solution to make. On one hand, we were not going to drain 25 to 35L of engine oil in the wild, as it would contaminate the soil, leave evident traces of tampering for the owners of the machines, and be a complex task to do without getting any on ourselves. We also did not know how full the oil tanks would be and did not want to risk overfilling them. We also needed to balance how much we were able to carry. Based on the Cash for Clunkers program, we remembered that it took 1.8L to disable a car engine, which ranges from 4 to 8L in capacity (ratio of 1/5 to 1/4 solution to engine oil).
We set out to make 5L of the solution, which would have given us a ratio of 1/5 of solution to engine oil. This amount was large enough to make a difference in the oil, as it would descend to the bottom due to its heavier density, and thus be used first. It was a low enough amount that it would not risk overflowing the oil tank capacity. Could we have made more? Perhaps, and this might be a reason why it did not work.
To make our liquid glass, we followed this ratio of ingredients, which would give us the 40/60 ratio used in the Cash for clunkers program.
1/4 cup (30g) uncrushed silica + 1/2 cup (118g) water + 20g lye crystals
The silica was found in silica cat litter. The sodium hydroxide was found by buying lye crystals used in soap making. Essentially, both ingredients are normal things to buy and easy to find.
Materials
- Silica litter bag (roughly one bag at 3.8L, the full amount was not used. It is alright if the silica is colorless and some crystals are colored, they will just dissolved at different speeds)
- Lye crystals (roughly 1lb or 454g)
- Water
- One or several thick plastic containers that one can pour out of and that were made DNA safe beforehand ideally (the solution is also going into an engine hot enough to destroy DNA, so its mainly the filled container that needs to be made DNA-safe afterwards)
- A source of constant heat, like a small burner or a rice cooker
- A metallic bowl that can sustain direct heat
- A metallic mixing spoon
* This method makes roughly 500ml of the solution at a time. Repeat as many times as desired. We found that increasing the amount of silica and lye just made the solution-making time increase, and made it harder for the silica to dissolve.
- In a medium heated metallic bowl, mix 1/4 cup of silica with 1/2 cup of water until much of it has dissolved;
- SLOWLY add 20g of lye crystals, in roughly 5g intervals as you keep stirring. This will make the solution exothermic, meaning it will bubble and release heat. If you add the lye too fast, the solution will bubble over and risks overflowing.
- Keep stirring until the silica has dissolved and you are left with a viscous solution.
- Pour the solution into your container, and repeat until you have the total desired quantity.
Make sure to not pour the hot liquid into a plastic bottle or it will melt through the plastic.
Once we had made the solution, we decide to test it directly in the field, which would involve turning on heavy machinery. Before this, we had tried without turning on the machines ourselves and by monitoring the site, but it was often impractical or impossible to watch the site or retrieve a camera from it later. We shifted to a testing model that then involved turning on and running the machines after applying the method. In theory, based on what we had read from blogs about decommissioning car engines, it should take anywhere between 10-30 minutes to hear a result from the running engine of a heavy machine breaking down. Unfortunately, after testing the liquid glass this way, and spending long periods of not-so-subtle time running heaving machinery in the middle of the night, we concluded that the liquid glass method we were trying to employ was ineffective at breaking down the engine. For the bleach, we unfortunately were not able to determine if it had been effective.
There are a lot of variables we were working with:
- Type of destructive agent (liquid glass or bleach)
- Quantity and ratio of destructive agent to the engine oil capacity
- Point of insertion (the engine oil tank)
- Length of time running the machine
Any adjustment of these variables could have been the magic answer to our question, but we came to the conclusion that the liquid glass method was not effective. The bleach method would require testing in the similar way as the liquid glass, meaning turning on and running the machine for 10-30 minutes until it breaks down.
8. Heavy Machinery Keys
Through much research, we were able to find that the keys for heavy machinery are not unique to the specific machine, rather a CAT/Caterpillar excavator key will work with all CAT/Caterpillar excavators of the same general model. You should bring all the keys that could potentially work on your model, and use them in a DNA and fingerprint safe way. We have acquired keys and have successfully turned on several types of excavators from different companies.
9. How to Turn on an Excavator
After applying the liquid glass technique (pooring it into the oil tank), we needed to run the machines for a minimum of 15 minutes to test if it worked. The start up instructions can vary by machine, but you can find video tutorials online that detail how to operate most common machinery.
- Unlock the driver’s door. The same key should unlock the driver door and start the engine.
- Get into the machine. Only one person will be able to sit inside, but you can leave the door open while starting and running the machine to keep in communication with your team.
- Put the safety bar up. This is a lever on the left side of the seat, between the door and the seat, and it needs to be raised to get into the machine and operated. In practice however, we found that on some machines it was the opposite, and on others it didn’t matter whether the bar was raised or not.
- Put on the seatbelt. Some machines will not turn on if the seatbelt is not on.
- Start the engine. Insert the key into the key slot and turn it to the start position. When the engine turns over, you can release the key back to the run position.
- Observe the inside of the machine’s cab. Check for warning lights. See if you can identify the controls and indicators. Make sure to keep the parking brake engaged. Avoid touching the hydraulic system – this can be extremely dangerous if you don’t know what you’re doing.
- Let the machine idle. After a few minutes of warming up, you can increase the speed of the engine using a dial usually identified with rabbit and tortoise icons.
10. Miscellaneous
Some random bits we learnt along the way!
- Do all your research on Tails!
- You can watch YouTube videos anonymously on DuckDuckGo’s video tab
- There is A LOT of radio interference in quarries and construction sites, due to the change in terrain elevation and the presence of rock/barriers to radiowaves
- Walkie talkie radios are good, but encrypted DMR radios are way better and the radio range is longer
- People use quarries for late night parties or for dirt biking. Be careful when you go, you might unexpectedly run into people
- Faulty machines can sometimes not turn off, even when the key is removed. Look into how to emergency stop your specific heavy machinery: some of them have emergency shut down cables that you need to pull on, or emergency stop buttons.
11. Final Conclusions
Our main takeaway is that doing substantial material damage to heavy machinery in a slow and undetected way is not as easy as old information leads us to believe. We describe in detail many different techniques, with their pros and cons. We have yet to find other techniques that look promising that fit this criteria (slow and undetected). The technique we tried, liquid glass, failed to destroy the machine. The other technique tried, bleach, was inconclusive. We might try it again, and then update this information with our findings.
We encourage saboteurs to look to other methods of sabotage, namely incendiary devices. These types of techniques are not subtle, however including timers (clocks and electrical relay timers, among other available information) can make them slower to ensure adequate time to get away.
Another takeaway from this is also that there are a lot of techniques that should work really well to stop the machines instantly without destroying them, which is less dangerous for everyone. These techniques are also faster than everything else, but prove much less permanently destructive.
We encourage others interested in heavy machinery sabotage to fact check and update this information. So far, there is no magic bullet, but we may have found some things that aren’t so good for the machinery. Most of these techniques can be practiced with fairly low stakes, and with minimal tools and machinery knowledge. We encourage the proliferation of more experiments against heavy machinery and towards the destruction of the techno industrial society.
Good luck and have fun!
12. Resources
- ALF Primer
- Ecodefense: A Field Guide to Monkeywrenching (Third Edition) by Dave Foreman and Bill Haywood
- No Trace Project (https://www.notrace.how/)
- DNA You Say? Burn Everything to Burn Longer: A Guide to Leaving No Traces (https://www.notrace.how/resources/download/blabladn/dna-you-say-read.pdf
- Office of Strategic Services 1944 Simple Sabotage Field Manual
- Ritchie Specs https://www.ritchiespecs.com/


 Anonymous submission to MTL Counter-info